Sidechain compression: Function, settings and applications

What is sidechain compression?

Sidechain compression is a technique where a compressor is triggered not by its own signal, but by an external control signal (sidechain) – for example, the kick drum briefly attenuates the bass ("ducking"). The control signal determines when the compressor engages; this creates the typical "pumping" of electronic music, adds space to the low end, and increases the mix's presence.

This technique is used wherever one signal needs to give way to another: the kick drum controls the bass, the lead synth ducks the pads, or the vocals slightly lower the playback. This keeps the mix clean – and simultaneously creates a rhythmic effect that you can use deliberately as a stylistic device.

All you need is a compressor with a sidechain input – either as a plugin in your DAW or as hardware. The control signal is applied to the sidechain input and triggers the compression as soon as it exceeds the threshold. You then use the attack, release, and ratio settings to determine how quickly and how strongly the ducking occurs. The Wikipedia article on compressors also explains the technical basics. Compressor in signal processing.

Sidechain compression can do even more. That's why, in addition to the well-known techniques, we'll also show you a few more practical examples.

Just in EDMIn this area, the pump effect is once again very popular. Related methods also include... New York Compression or Upward compressionBut first, let's look at the three best-known applications.

How do I set up a sidechain compressor?

Here's how to set up sidechain compression step by step:

  1. Select compressor: You need a compressor with a sidechain input – either as a plugin in your DAW or as hardware.
  2. Set target signal: Place the signal that you want to compress into the input of the compressor – for example, the bass or a vocal track.
  3. Route control signal: Send the signal that should trigger the compressor to the sidechain input – typically the kick drum or a synth.
  4. Set threshold: The threshold determines at what level of the control signal the compressor engages.
  5. Attack and release form: This determines how quickly the dip starts and how long it lasts – this shapes the character of the pump effect.
  6. Ratio and Make-up Gain: The ratio determines the strength of the compression; you then use the make-up gain to balance the level.

Take your time to really understand the parameters – and ultimately trust your ears.


Sidechain compression used in the bass range

Especially in electronic music, sidechain compression creates dynamic, punchy bass. The kick drum acts as a control signal: as soon as it hits, the compressor briefly attenuates the bassline. This ensures the kick retains its punch and doesn't get lost in the bass. Whether the compressor reacts to RMS or peak frequencies further determines how smooth or direct the attenuation is.

Sidechain compression as DeEsser

Cost-saving measures or employee flexibility De-Esser Got one handy? Then you can easily build your own using sidechain compression: Duplicate your vocal track and route the copy to no output – it serves only as a control signal. Then, boost the 7–9 kHz range on this track using an EQ and send it to the sidechain input of the Compressor on the audible vocal track. A ratio of around 3:1 is a good starting point; you can adjust the rest by ear.

Separate or lift passages from one another

Furthermore, you can use sidechain compression to differentiate individual passages: one signal recedes as soon as another enters. This is particularly helpful with instruments in the same frequency range – such as piano and guitar. Set the threshold to RMS so that the compressor only activates above a certain average level. Combined with automation, this allows you to give the chorus more power or selectively bring individual instruments to the forefront.

Nested sidechain compression

I've set up a triple-layered sidechain compression. I did this because, firstly, I wanted to compress the kick drum in the Mix to get through better – and secondly to create a unique, slight pumping effect between sine bass and synth bass, which provides more variety in the drum set.

I did this nesting as follows:

Kick drum as a signal generator

Here, the kick drum serves as a control signal for the synth bass and sine bass. I've switched the tap from post-fader to pre-fader – the control signal is therefore tapped before the volume fader and thus remains independent of the fader.
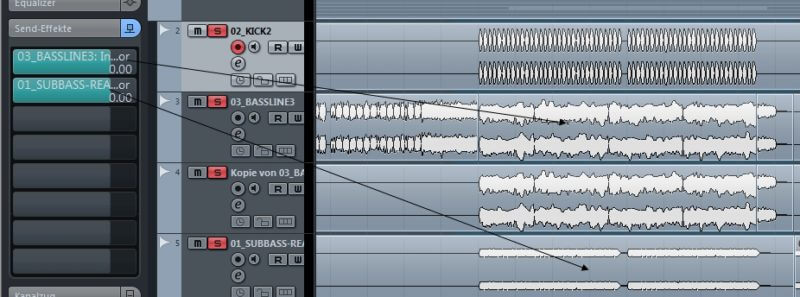
Sidechain in Cubase

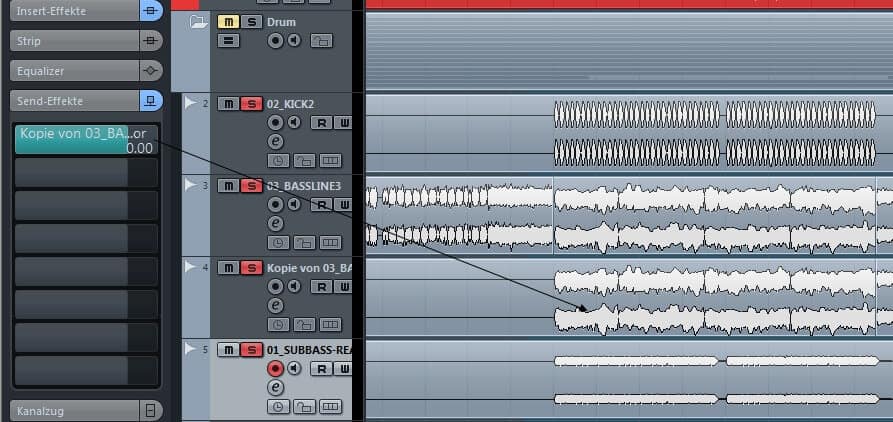
Sine bass as a signal generator

Here, the sine bass serves as a control signal for the parallel compressed synth bass. Send effects Cubase
Settings of the three sidechain compressors

Here you can see the settings of the three sidechain compressors. Side chain compression Cubase  
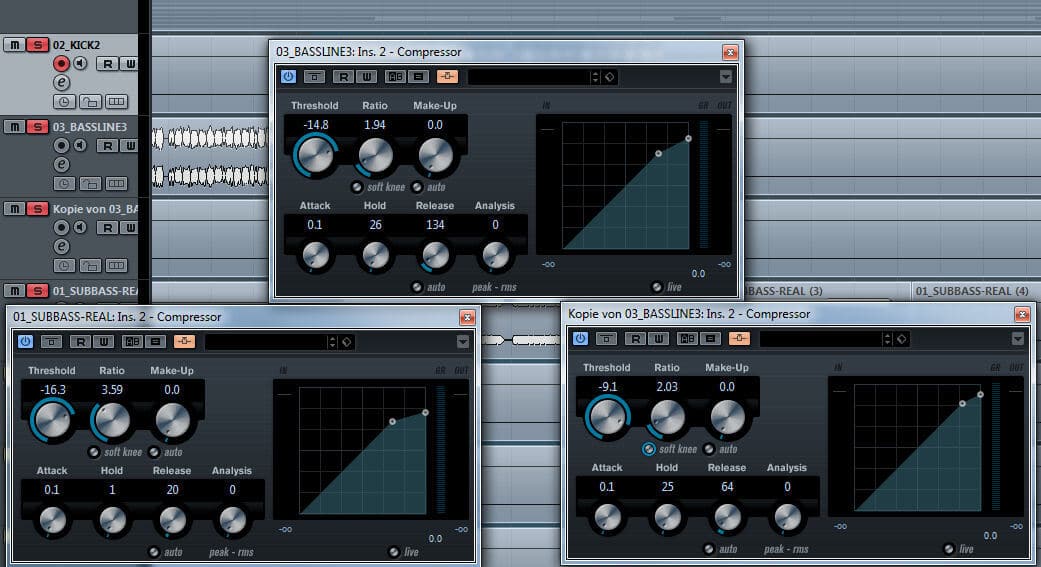
You can, of course, freely vary the settings shown. Because the following also applies here:

Good is what sounds good and pleases.

Incidentally, effect channels can also be controlled via sidechain – particularly interesting with reverb and delay. For example, use the delay signal as a control signal for a reverb: combined with a transient shaper on the reverb channel, you can create unusual effects in no time. There are no limits to your creativity here. Have fun! Mixing and mastering.


Image by Chris Jones

Chris Jones

CEO – Mixing and Mastering Engineer. Founder of Peak-Studios (2006) and one of the first online service providers for professional audio mixing and mastering in Germany.